Hallway Bathroom Transformation – White + Blue with Brushed Gold Accents
I’m so excited to share this space completely transformed and these amazing before & afters with you. This bathroom is the first space we’ve completely finished in our new home we began renovating in March. We shared our plans for the entire home in our Pre-Renovation Tour here.
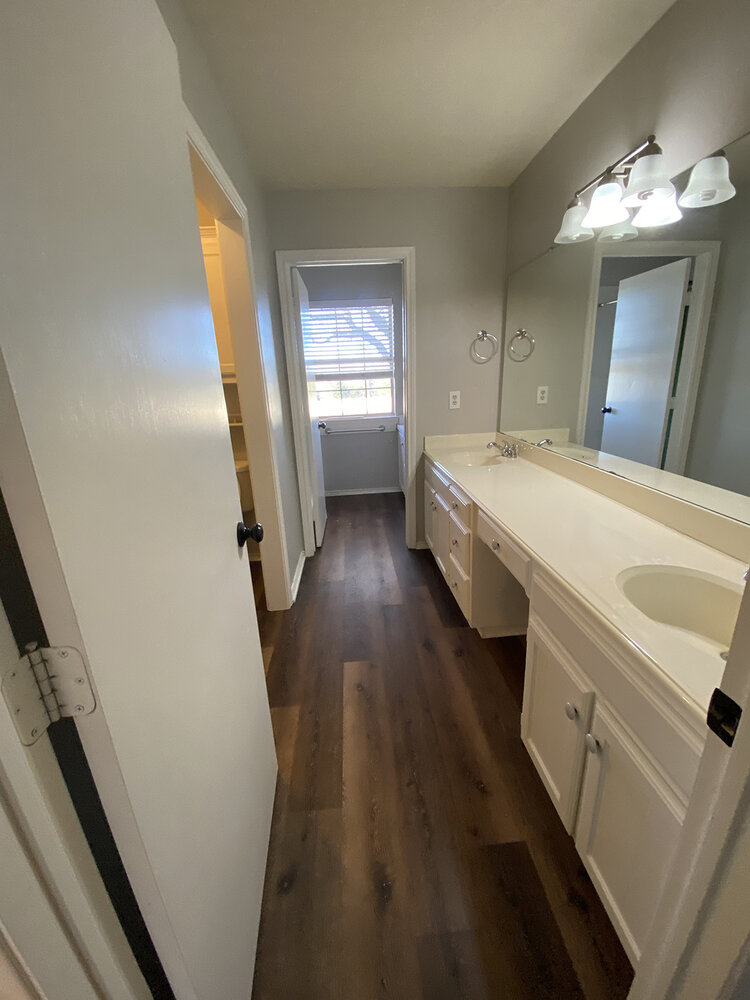
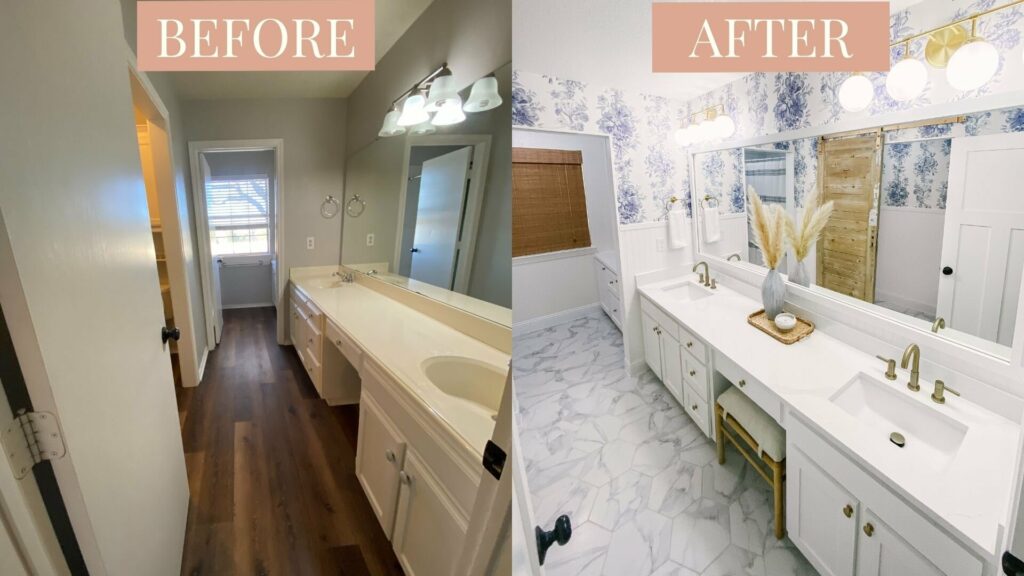
Before purchasing this home, the hall bathroom was really the only space I had trouble developing a vision for. The layout was long and choppy with no flow. It was bigger than the average hallway bathroom which I loved and I knew with some time and inspiration it could be amazing.
BEFORE
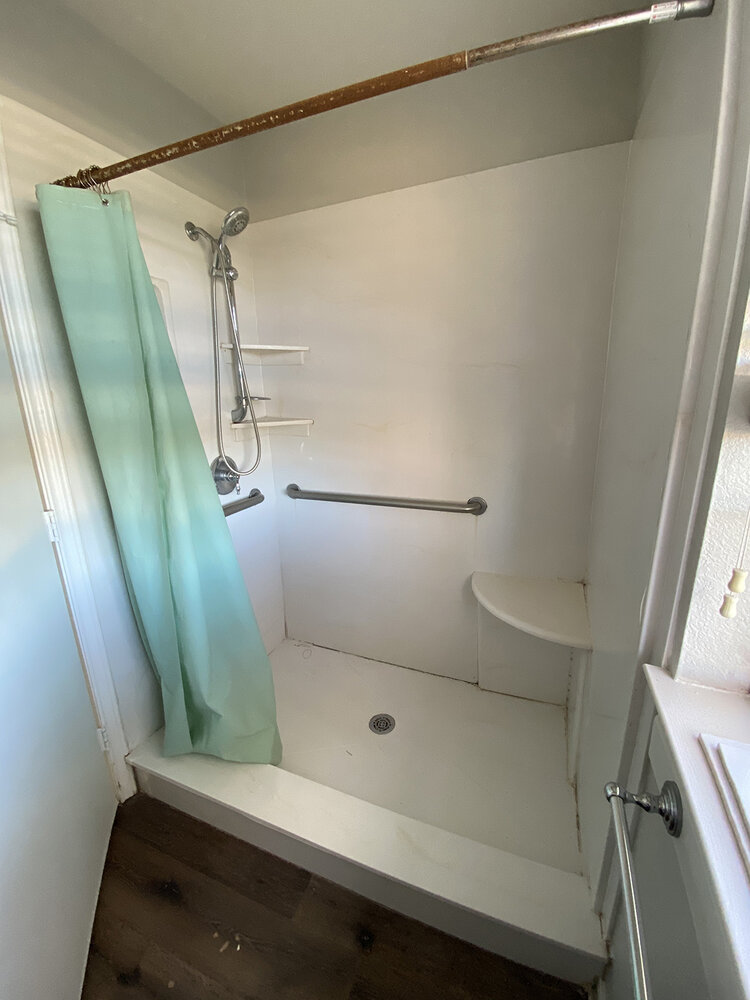
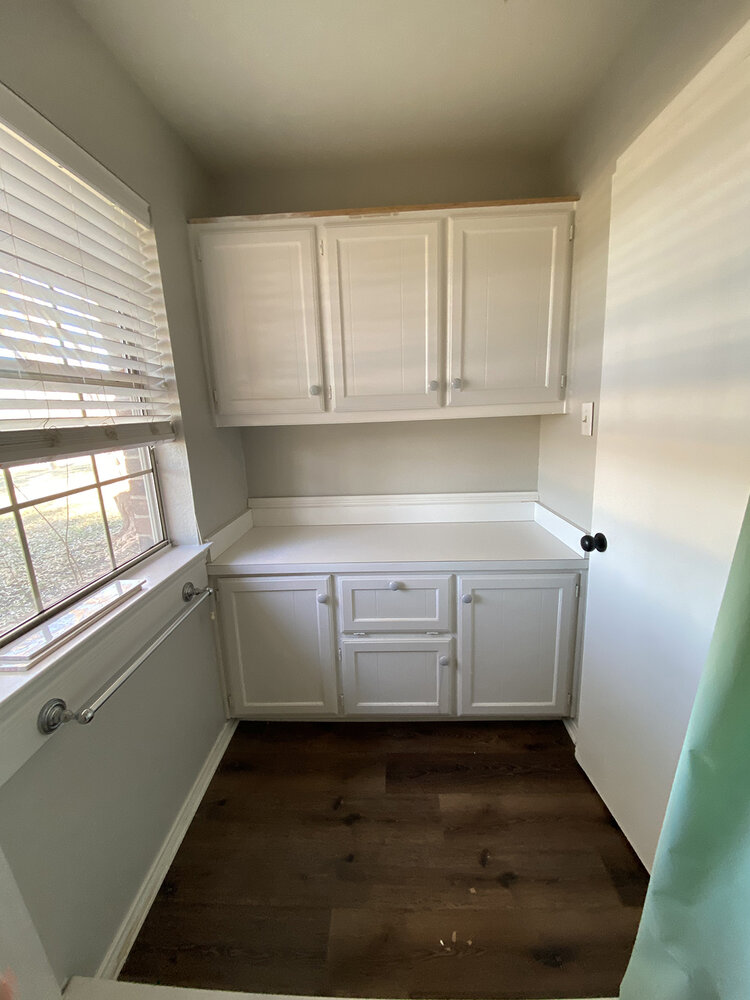
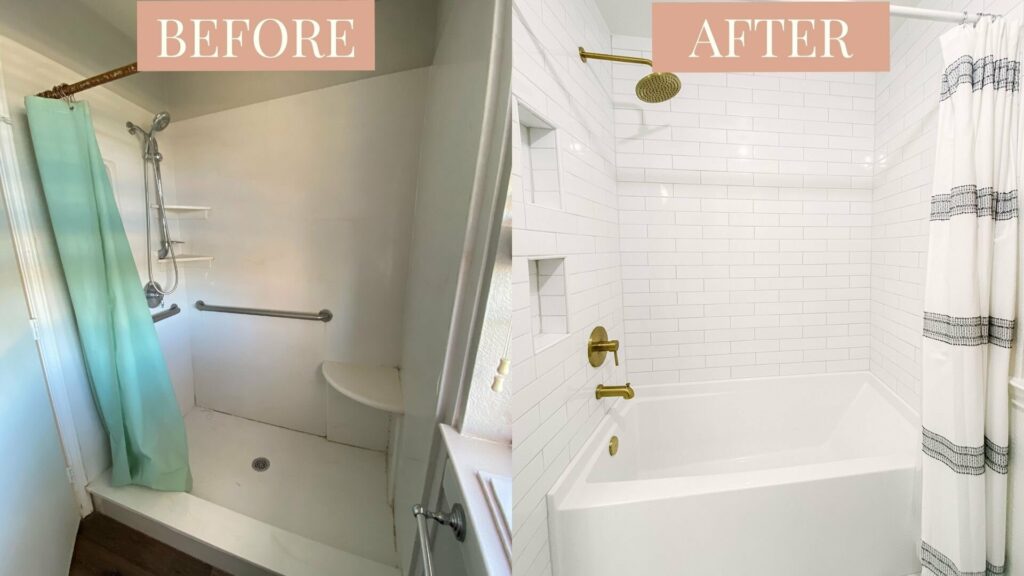
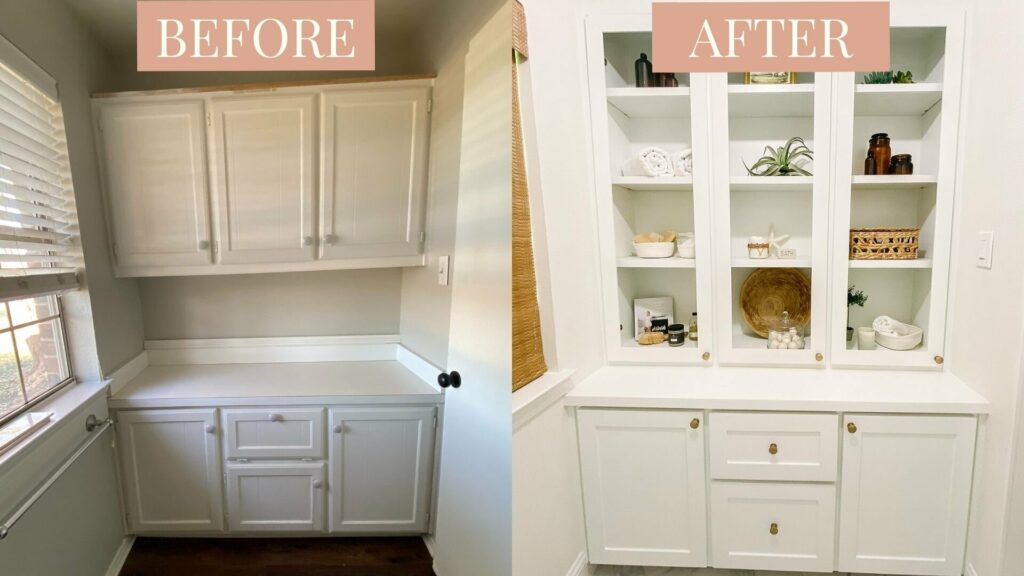
You can see in the before photos that the bathroom is very long. The opening for the water closet was extra wide with no door. The shower was dated with a cheap surround. Across from the shower was a built-in that looked like a gas station changing table. Despite these interesting features, I was able to create a design plan that I was super excited about seeing complete.
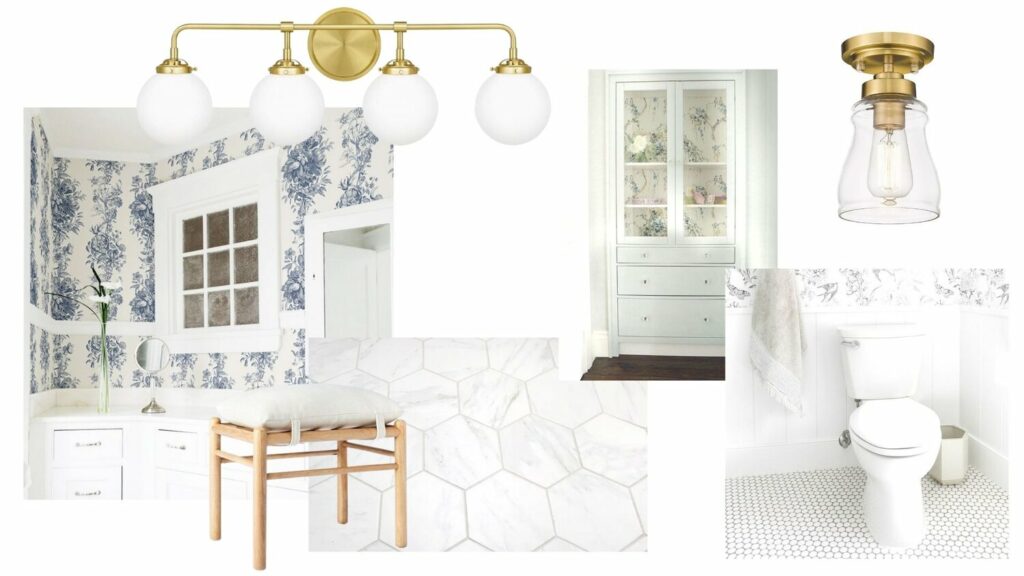
INSPIRATION
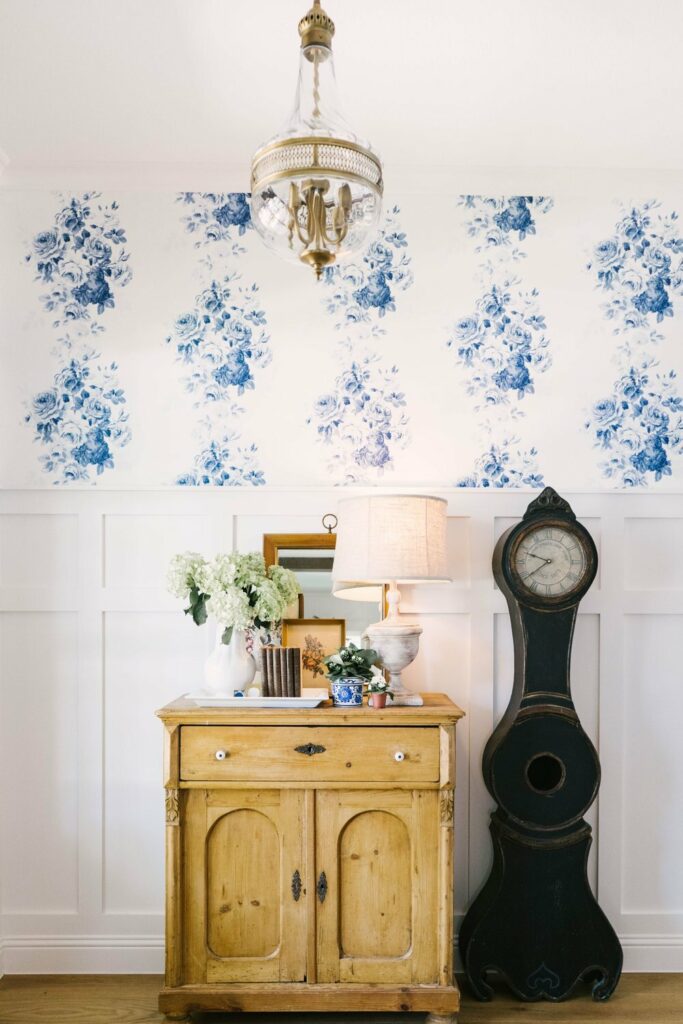
When searching for inspiration for this bathroom I thought of my friend Stephanie of BloomingIvyLane’s entryway and wanted to use this look to transform the room. I loved the vintage-inspired blue toile wallpaper with the wainscoting. The gold accents and warm woods completed the look! I’ve loved her entryway for a long time and ran with it. When designing a room don’t be afraid to use inspiration from other spaces. Thinking outside of the box like this can really make a project fun and unique to you. You can see the design board I created for the bathroom based on this inspiration below.
If you want more inspiration from Stephanie’s home and to see more of the entryway that inspired me head here to tour her entire home.
Step one for completing this bathroom correcting the flow and making it feel more intentional. I wanted to do this on a budget so I wasn’t going to completely rearrange the bathroom. The first thing we did was decrease the opening for the water closet. It’s still wide enough that if we had a guest in a wheelchair they could use the bathroom, but functions for our family day-to-day. I found a really amazing barn door from Europe that will add character and function to this opening.
I also opened up the doorway to the shower and made it a case opening rather than having a door there. The door wasn’t functional and just got in the way. We knew we’d be bathing our one-year-old and future children there and the door would be in the way.
Now that the flow is corrected we could tile. I had readers vote their tile choice in our pre-renovation home tour and I was so happy you all chose the faux marble hex tile. The shape is so fun, but the marble look adds a little bit of sophistication. I found a budget-friendly soaker alcove tub from Home Depot and a simple subway tile to complete the tub/shower area.
Now for that strange little gas station changing table area. My mom had the amazing idea to use this area for a built-in linen cabinet. It turned out perfect and looks so intentional like the area was made for it. The cabinet maker was able to remove the dated countertop and use the existing cabinet box to build the built-in. He created a top and added new doors. This area is going to be practical and fun to decorate.
We also used the existing vanity in the bathroom and had our cabinet guy add new doors. We added a fresh coat of paint and a new quartz countertop and this area was completely transformed. Using the existing vanity saved me around $2000.
I decided to add beadboard and wallpaper for another layer of character to this bathroom. This bathroom will be primarily used for Quinn (my old-year-old) and other future children, so I wasn’t to do something fun. I picked a wallpaper from my favorite wallpaper source—Livette’s. I love Livette’s because they can customize any of their prints in any color you’d like. I chose a custom wallpaper when using them on past projects, but here I chose to use the blue they already had on this blue toile print. I chose to use the traditional wallpaper that is installed with glue. I had applied it in the past and it was so easy.
After I installed the wallpaper, I hired my painter/handyman to install the beadboard. I’m getting more confident with DIY projects, but sometimes it’s nice to just hire the pros. He did an AMAZING job.
The final project was the mirror. I used FrameMyMirror to transform this broken, builder-grade mirror and I love how it turned out. The vanity is 9ft long so finding mirrors to fill the space was hard. Plus, I wanted the area where the vanity stool goes to still have a mirror. The best option was a mirror that went across the whole wall. Typically mirrors like this aren’t seen in trending home design pins or Instagram images…until now with the help of this simple frame from FrameMyMirror. It gave the mirror the perfect dose of charm and sophistication. Bonus it’s SO easy to install. I have a full tutorial on this piece of the project coming out next week. If you’d like to order a FrameMyMirror kit use my discount code FarmhouseLiving15 for 15% off.
Full tutorial and details on FrameMyMirror here.
The final touches were the hardware, bamboo shade, and cute accents on the countertop and in the linen cabinet. I’m so happy with how it turned out. I still can’t believe the before and after. This bathroom might be my favorite project to date. I love the traditional elements with a modern twist. What’s your favorite part of the bathroom? I’d love to know in the comments below.
SHOP THE LOOK

BEFORE & AFTERS
I can’t wait to reveal more spaces in this home. It’s been a blast so far to remodel, but we still have a long way to go. If you’d like to tour the home pre-renovated head to the blog here or watch on our YouTube channel here.